In the United States, you have the legal right to modify your dog’s appearance, in certain ways. When it comes to ear cropping and/or tail docking of Dobermans, we believe that it is the breeder’s and owner’s choice. There are many opinions on these procedures, and we respect everyone’s right to feel the way they want to about them. The AKC breed standard includes these modifications. If you do not want your puppy’s ears cropped, then leave them long and floppy. That is your choice, and the dog will be beautiful either way.
Tail docking will be done early, to make it easier for the pups to heal. Our puppies will all have docked tails. Docked tails are standardized in the breed by the AKC, “docked at approximately second joint, appears to be a continuation of the spine”.
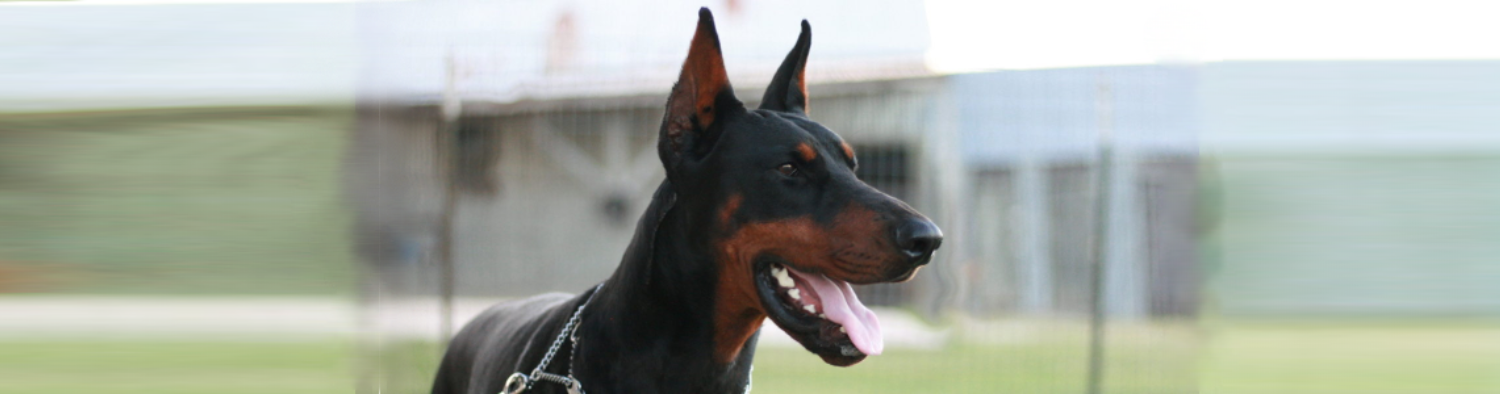
When it comes to ear cropping, we feel it’s more of an art than a science. We also feel that it is a matter of personal preference. Some prefer short, some prefer long, some prefer straight, some prefer curved. For this reason, and due to the age of the puppies when they go home with you, we leave ear cropping to you, unless you make additional arrangements with us. We have had great success with www.eartrim.com. This veterinarian is located in The Woodlands, TX. Dr. Revere does beautiful work.
You will need to be prepared for 2.5+ months of care for the ears, once cropped. The care will be more intense, at the beginning while they are healing. Once healed, and the stitches are removed, it gets easier. It is a big commitment, but we feel the result is worth it. Once the stitches are out, we think it is best to learn to brace the ears on your own, rather than making a trip to the vet every 5-7 days. But, depending on your circumstances, you may opt either way.
We are happy to help you with support on ear crops, in any way we can. Please check out our blog post on How to Post Doberman Ears After Cropping. Also, the steps are detailed below:
Materials needed:
- Big, thick zip ties. These ties are pretty rigid. https://amzn.to/3Gp6DEq
- Dr. Sholl’s moleskin plus padding tape: https://amzn.to/3roUpan.
- Torbot glue: https://amzn.to/3rqXLtm
- Unisolve glue remover https://amzn.to/3GqKG7C
- Stretch athletic tape: https://amzn.to/3GpyGU9
Process:
- Cut the zip ties about an inch longer than from inside the pocket in the bottom of the pup’s ear to the tip at the top. Make sure both ends of the zip tie is flat, not pointed.
- Cut some of the moleskin foam, just enough to cover the tip that will go in the ear. I believe it’s self adhering. You should have a short plastic stick with a foam tip, now. You can make this as thick as is needed to help it stay in the ear.
- Cut a strip of your adhesive tape that is long enough to go from the base of the front side of the ear, over the top of the ear, and all the way down the back. Cut several more straps about 5 inches long.
- Take the torbot glue, and thoroughly coat the smooth side of the zip tie. It must be the smooth side. Then take the glue and give the inside of the ear a good coat also. Be very generous with it. Place the foam covered tip of your stick in the pocket inside the ear. It’s the spot in the ear right in front of the ear canal. You hold both the glue side of the ear and the glue side of the stick together, firmly, for about 45 seconds. You want to keep the ear very taught, and put a little pressure down on the stick, all at the same time. The idea is to gently stretch the ear so that it will keep some pressure on the stick, down into the ear, once bonded.
- Cut the excess plastic off the top so that it is only about 1/8-1/4″ taller than the ear.
- Take the long strip of tape and go from the base of the front side of the ear, over the top of the ear, and all the way down the back. Press to adhere. The goal of this strip is to hold some downforce on the stick. Take the shorter straps, and wrap them around the circumference of the ear. Make sure it’s covered in these horizontal strips from bottom to top.
- At this point you’re done. If you did it right, it will hold until the next time you redo them. You will need to soak the inner layers in Unisolve, very thoroughly, before removing. This will make it super easy and keep you from ripping out the pup’s ear hair. The Unisolve will make it easy to clean off the excess glue.
The following video gives a good demonstration of steps 1,4, and 5, above. These are critical. Posting ears with zip ties
Hope this brief guide helps. We are happy to help you with support on ear crops, in any way we can. Please reach out if you need help.